
 Deutsch
Day 12: MQTT Button
Today we will find again a button hidden behind the door of the Advent calendar. In our experiment today we will continue to cover the MQTT protocol, but this time in conjunction with Node-RED. We will also learn how two buttons can be evaluated simultaneously. The experiment today is structured as follows:
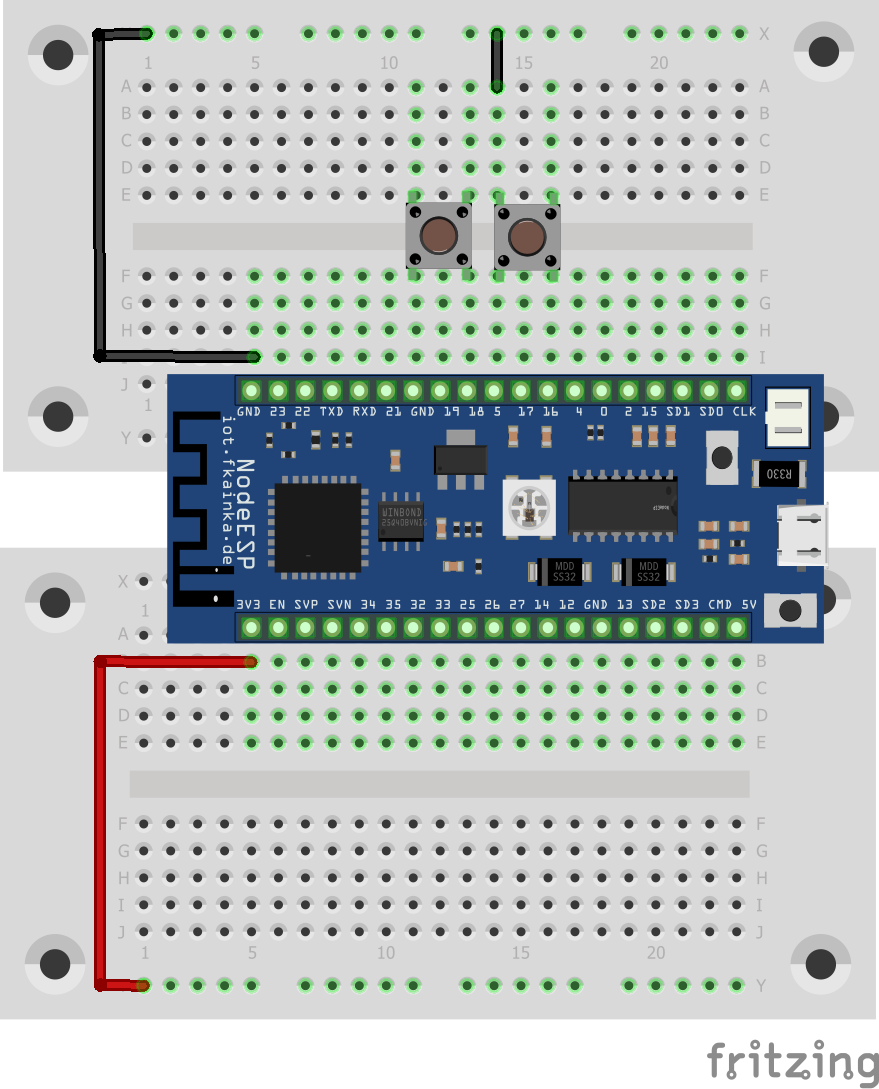
Setup with two buttons
So now we have two buttons that we can use. We activate the program for today. Then we import the Node-RED flow. You need to adapt it slightly by replacing [PID] in the topic with your personal MQTT ID. That’s pretty easy if you use this trick:
Copy the Node-RED flow into a text editor of your choice such as the Windows Editor for example. Select the Replace option (in Editor under Edit/Replace ([Ctrl + H]). Enter [PID] into the Search for field and enter your personal ID in Replace with. Click Replace All and you have adjusted the flow and are now able to import and start it in Node-RED. But don’t forget to disable previous flows.
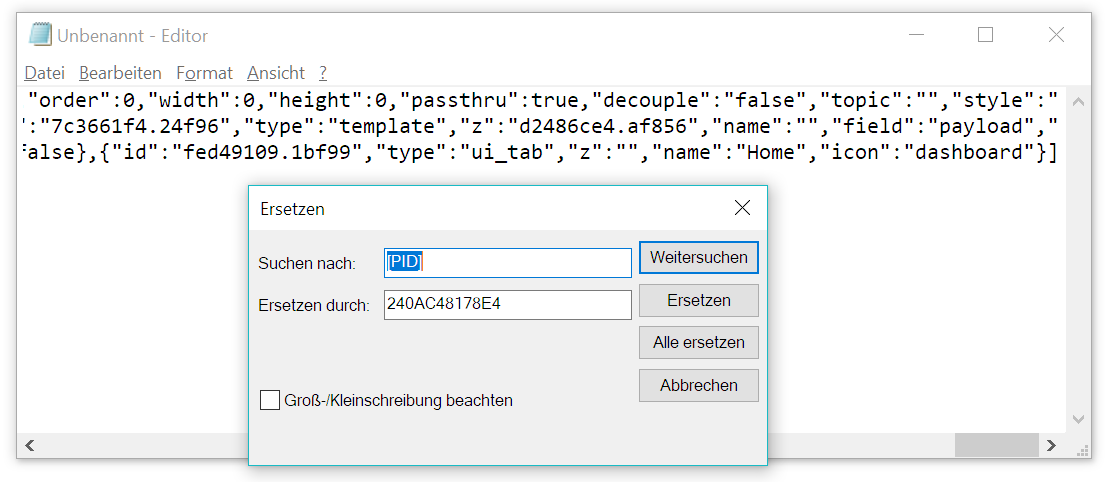
Adjusting the flow using your personal ID is easy
In Node-RED go to the Debug tab and press a button on the breadboard. You will see the following message for example:

The JSON Message
Key cmd will send the command get_button_state. Under value is an array with all buttons and their values. You can identify a button using pin_name, pin_id or pin_no. The first two values are already defined, the third indicates the used IO pin on the board. Pin_state indicates the button’s Boolean value, which is TRUE or FALSE or HIGH or LOW. By the way, if the button is not pressed, the pin value is TRUE, because the pin is pulled to high by means of the internal pull-up resistor and by pressing a button it is pushed too low. The pin_value key indicates an analogue value which is not important for our buttons.
I pressed Button2 here, and the board instantly sent a message with all enabled buttons and their values to the out topic that is affixed to the debug node and also to the topic
NodeESP/[PID]/button/state/get/out
The latter topic is evaluated in Node-RED. Then there is a JSON node, which converts the plain text into a JSON object. Split node separates the button array into individual elements, which are passed on to the switch node one by one. This node checks the pin name and then determines which one of the two buttons that is. Template node then merely filters the value of the pin_state and sends TRUE or FALSE to the next node. This is a dashboard button that indicates a state, which is on, if the value was FALSE, and vice versa. Here it inverts the value of the button, so to speak.
If you switch to the Dashboard, for example by clicking on the Dashboard tab on the right and then click the rectangle with the up arrow, you, too, can see the two buttons. When you release the button, the board immediately informs you about the status change and you can see straight away, which button is pressed and which button is not pressed.
The huge advantage of MQTT and using an online broker is that you can assess the buttons from anywhere in the world. You could for example take the board with you to your job, while the Node-RED server is running on a machine at home. And then you could control the lights or the heating when you are on your way home, or you could use speech output to tell your folks at home that you are on your way. And all this you can do with a simple push of a button from anywhere in the world.
Funktioniert, so wie in der Anleitung beschrieben wunderbar…
Den Flow leicht an ein praktisches Anwendungsbeispiel angepasst :-)
Bei mir funktioniert nur ein Knopf. Wenn beide Buttons nicht gedrückt sind, sind beim funktionierenden Button ca 3V zwischen den Beinchen, beim “kaputten” nur 0.01V. Beim Drücken gehen (wie erwartet) die Spannungen jeweils auf 0V. Dass dann beim 0.01V-Button keine Nachricht an den Broker rausgeht ist nicht verwunderlich.
Ist der IO18 vielleicht falsch konfiguriert und es fehlt ein pull-up?
Neue Erkenntnis: Wenn man mit einem Patchkabel IO18 auf 3V3 zieht (statt auf 0V mit dem Button aus dem Originalschema) dann wird eine mqtt-Nachricht versendet. Das bestätigt die Vermutung, dass IO18 falsch konfiguriert ist und einen Pull-Down statt eines Pull-Ups hat.
Die Verkabelung ist unvollständig. So kann der andere Button kein Ereignis auslösen. Beiliegend meine Verkabelung, bei der beide Buttons ordnungsgemäß reagieren.
Soll das so sein?
Hallo,
nach den FW Update 16.12.2018
Auch geschafft mit eigenem Broker :-) Klappt bisher auch bei mir alles so wie es soll.
im Flow angezeigter Button-state wird nicht dynamisch angepasst, solange der Button gedrückt wird ..
Dashboard und Flow zeigen Unterschiedliches an, ist das normal? wie müßte das korrigiert werden??
Hallo,
ich denke das ist im Programm des NoeESP drin.
Es wird hier die abfallende Flanke gemeldet, es müsste schon beim Druck des Tasters/Button, ansteigende Flanke eine Meldung erfolgen.
Ob überhaupt eine Flankenauswertung erfolgt wewis man nicht.
Hallo,
das ist richtig, aber alle zwei Button aufeinmal überwacht und gemeldet.
So wie ich das verstehe wird hier wohl einmal der Druck und beim zweiten Mal das Loslassen gemeldet.
Hallo,
mit dem Broker auf dem Raspberry Pi.
Moin,
Warum kann ich nicht meinen eigenen Mosquitto Broker nutzen?
Ich habe am ESP meinen Server eingerichtet, aber es kommen keinerlei Pakete an.
Hallo,
haben Sie in dem Node-RED-Flow den Broker geändert?
–> Schnipp <–
{
"id": "3c53c9b8.8965a6",
"type": "mqtt-broker",
"z": "",
"name": "fkainka.de",
"broker": "broker.fkainka.de", <<<— hier die IP-Adresse oder den Server eintragen
"port": "1883",
"clientid": "",
"usetls": false,
"compatmode": true,
"keepalive": "60",
"cleansession": true,
"willTopic": "",
"willQos": "0",
"willPayload": "",
"birthTopic": "",
"birthQos": "0",
"birthPayload": ""
},
——
Ja, das hat damit aber nichts zu tun.
Es gibt keinerlei Pakete vom NodeESP, die sich am Broker Interface melden.
Auch über Wireshark sind keine Pakete zu sehen. Ich hatte meinen Wifi AP in verdacht gehabt, der lässt aber Client Kommunikation zu.
Mmmhh… Hierzu kann ich nur beschreiben, wie es bei mir funktioniert hat, in der Hoffnung, dass das etwas hilfreich ist. Bei mir musste ich das Programm “day12” (logisch) auf dem NodeESP laden (und das noch einmal prüfen) und danach die MQTT-Konfiguration. Der NodeESP zeigte erst einmal “rot”, nach einem neuen Laden wurde die Anzeige “grün”. Ich meine, dass ich ihn zwei bis drei Mal neu gestartet habe :-| (o.k. keine sinnige Problemlösung)
Im Node-RED müssen die beiden MQTT-Felder ebenfalls “connected” anzeigen (hier verwende ich einen anderen Rasp-Pi als Server). Mit einem doppelten Klick kann die Konfiguration (am besten eine IP-Adresse) geprüft werden.
Auf dem RaspPi mit dem Mosquitto-Server kann unter /var/log/mosquitto die Log-Datei angeschaut werden. Wenn alles läuft, sieh das ungefähr so aus:
“1544644050: New connection from 192.168.XXX.ESP on port 1883.
1544644050: New client connected from 192.168.XXX.ESP as [PID] (c1, k15).
1544644169: New connection from 192.168.XXX.RED on port 1883.
1544644169: New client connected from 192.168.XXX.RED as mqtt_[PID-RED] (c1, k60).
1544644189: New connection from 192.168.XXX.ESP on port 1883.
1544644189: Client [PID] already connected, closing old connection.
1544644189: Client [PID] disconnected.
1544644189: New client connected from 192.168.XXX.ESP as [PID] (c1, k15).
1544644377: Client mqtt_[PID] disconnected.”
Aaaaalso: Ich bin dem Problem auf die Schliche gekommen.
Mein Broker arbeitet einwandfrei.
Leider schein das Programm auf dem ESP Probleme zu haben.
Ich musste mehrfach resetten und andere Programme laden, bis ich nun endlich die erste MQTT Nachricht vom ESP auf der Leitung sehen konnte.
Aber Meine Broker antwortet mit Connection refused. Warum? Na ganz einfach: der kleine ESP sendet im connect command kein User oder Passwort mit und deshalb bekomme ich keine Verbindung.
Ich hier mal nen Screenshot gemacht.
@Der Zingel,
deine, ich drück es mal so aus, ‘Vermutungen’ können nicht stimmen.
Ein altes und immer passendes Sprichwort sagt:” Wer viel misst, misst Mist.”
Schau bei mir, ich habe nach der gepostetn Anleitung einen HQTT Server als Service auf einen RPi installiert und laufen.
Dazu und auch zur Kommunikation, NodeESP -> PC/Browser, war kein Passwort nötig.
Dein Problem liegt wo anderst.
@Der Zingel,
gerade einen Broker auf dem PC aufgesetzt und erfolgreich getestet.
2.Bild
Ich hatte beim iobroker auch ein Passwort für mqtt eingerichtet, ging auch nicht, habe dann den Passwortschutz entfernt dann ging es, scheint also so als ob die Einstellungen beim ESP für Benutzername/Passwort nicht funktionieren.
Eventuell überträgt der esp das Passwort verkehrt, eventuell hilft es den hash aus der Passwortdatei zu nutzen.
Hallo Frank,
1. was ist ein ioBroker?
2. ich habe nirgendwo ein Benutzer/Passwort
Wenn ich den Broker auf dem RPi starte werde ich nicht gefragt nach einem Benutzer/Passwort, geht auch nicht da ich den als Service laufen habe.
Auf dem PC starte ich auch nur die exe fertig, kein Benutzer/Passwort
@paulaner
Bevor man sich aus dem Fenster lehnt, sollte man überlegen ;)
In der NodeESP Firmware ist ein Bug, der verhindert, dass Userdaten, die man im Broker eingerichtet hat nicht im Connect Command übertragen werden.
Mit dem Screenshot habe ich das nachgewiesen.
Hallo,
eventuell äußert sich Fabian mal dazu, ober schon mit einem Benutzer/Passwort Erfahrung hat.
@Der Zingler
nimm meine Entschuldigung wenn ich falsch liege.
@paulaner
Kein Problem.
Mal schauen, ob sich Fabian meldet.
iobroker ist ein mqtt-Broker (unter anderem). Ohne Passwort geht es ja auch, aber am mqtt-Broker kann man ein Passwort einrichten damit nicht jeder darauf zugreifen kann, und das gleiche Passwort müsste man dann am ESP eingeben damit er sich anmeldet, aber das geht eben nicht. Also eingeben geht schon aber funktionieren tut es nicht ;)
Danke, wieder was gelernt.
Nutze Node-Red als App unter iobroker. In iobroker aber mqtt-Client installiert. Auf dem Rechner mqtt-Server separat. Das läuft.
Hallo,
ich habe auch gerade meinen eigenen Mosquitto Server auf einen Raspberry 3B eingerichtet.
Die IP in der config von NadeESP rein und submitted.
Die zwei Änderungen im Flow, fkainka.de gegen meine RPi IP, deployed, fertig.
und hier eine ganz einfach Anleitung.
https://www.open-homeautomation.com/de/2016/06/09/install-an-mqtt-broker-on-your-raspberry-pi/
Hallo,
klappt wunderbar.
Beim debuggen bekomme ich pro Button zwei (2) Meldungen.
– bei einer ‘pin_state’ = true
– bei der anderen ‘pin_state’ = false
ok
So wie ich das verstehe wird hier wohl einmal der Druck und beim zweiten Mal das Loslassen gemeldet. (Sorry, eben den Antwort-Knopf übersehen)
Soll das so sein?