
 Deutsch
Quick Start – NanoESP & Pretzelboard
When you attach the board for the first time via the MicroUSB connector, your PC will try to install a driver. If this does not work automatically download and install the driver here.
The ArduinoTM IDE provides the simplest way of programming the development board. Download the IDE from www.Arduino.cc. When you start the software, you first have to choose the correct port and board. For the latter, you select the Arduino NanoTM (ATmega328 processor).
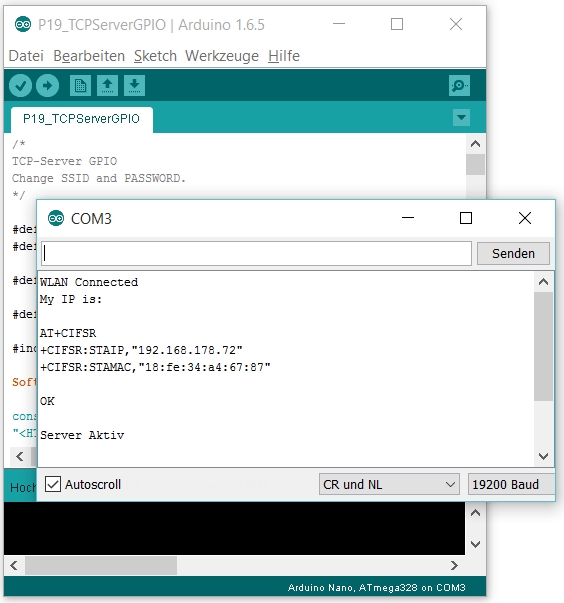
The settings of the IDE (right below) and the Serial Monitor
In order to test the WiFi module, you open the serial monitor and select a transfer rate of 19,200 baud. As long as no other program is loaded into the controller, the monitor should display a few messages. Furthermore, you will now find an open WLAN called NanoESP. To control the module yourself, use the Software Serial library via pins 11 and 12 with a transfer rate of 19,200 baud or just donwload the programm to your computer and upload it via the Arduino Software to your board:
Downlaod: Example Programm
The serial monitor has to be set to CR and NL. The following AT commands are useful for the first test:
Test command: AT
Reset: AT+RST
Firmware info: AT+GMR
Hello all
I managed to brick Conrad NanoESP by sending AT+RESTORE…
Is there some way, how to restore its function?
The sending AT+UART_DEF=19200,8,1,0,0 or running of Reinitialisation.ino doesn’t work.. :-(
Thank You much for Your help in advance..!
Hi, as you already detected you changed the baudrate by using the restore command. It is difficult to set the right baudrate again. If you start the Reinitialisation.ino multiple times you might be lucky. otherwise there is a more complicated way I can show you after you tried the easy way.
If erverything fails try: https://iot.fkainka.de/nanoesp-updaten with the new or the current firmware
Vielen dank!
I’m interested if there isn’t some way, which wouldn’t require flashing Your device. After all, after reset it should be in just the state after flashing, or not?
At any case, I did run Reinitialisation.ino multiple-times, including detaching from power – but without success. It’s a bit strange situation for me: why NanoESP after AT+RESTORE isn’t in the same state, like after fresh flashing of firmware?
It doesn’t give too much meaning for me..
Anyway, thank You for Your kind support and for Your early reply!
Memo learned: Für Kinder unter 14 Jahren nicht geeignet!
There is more info regarding this situation
https://iot.fkainka.de/forum/topic/kann-nichts-mehr-hochladen-und-das-board-reagiert-nicht-mehr
It seems, AT+RESTORE is common trap for NanoESP beginners
Did you have any success jet?
There is even more info about unbricking NanoESP after AT+RESTORE
http://iot.fkainka.de/configtest2 https://iot.fkainka.de/wp-content/uploads/2015/12/ConfigTest2.zip
I’ll continue with it tomorrow. "Pure software" approach failed, as it seems, ESP doesn’t communicate in any common speed with Nano after issuing AT+RESTORE command.
esp8266.end();
esp8266.begin(9600);
sendCom("AT+UART_DEF=19200,8,1,0,0", "OK");
esp8266.end();
esp8266.setTimeout(1000);
esp8266.begin(19200);
sendCom("AT+UART_DEF=19200,8,1,0,0", "OK");
esp8266.end();
esp8266.setTimeout(1000);
esp8266.begin(115200);
sendCom("AT+UART_DEF=19200,8,1,0,0", "OK");
esp8266.end();
Ich hatte Probleme beim ersten Versuch ein Sketch upzuloaden.
Fehler war, ich habe mich an die Anleitung gehalten, und als Prozessor den ATMega328P ausgewählt. Zumindest in der IDE 1.8.8 will er aber (old Bootloader).
Vielleicht hilft es anderen, die auch sync Fehler haben (Baudrate nur halb so hoch)
Hi,
Hat sich erledigt. Baudrate war nach dem Factory Reset auf 115200. Seit Umstellen auf 19200 ist wieder alles i.O.
Grüsse
Jürg
Hi,
Habe möglicherweise einen Fehler gemacht:
Nachdem ich Schwierigkeiten hatte, das Pretzelboard mit meinem WiFi-Netzwerk zu verbinden, habe ich den ESP auf Factory Defaut zurückgesetzt (AT+RESTORE).
Seither erscheinen im Serial Monitor nur noch unleserliche Zeichern.
Lässt sich das “reparieren”?
Grüsse
Jürg
Hallo Leute,
also ich habe den NanoEsp erfolgreich in Betrieb genommen, es ging auch so weit alles gut, nur eine Falle gab es: Unbedingt die neueste Arduino Version verwenden ( ab V6.x ). Leider ist die Doku zu dem Board und zur NanoLib ziemlich mager, und man muss sich vieles im Web zusammensuchen. Der Code ist ebenfalls schwach dokumentiert, für einen Anfänger schwer zu durchschauen. Es fehlt auch ein Gesamtschaltplan des Boards ( Eagle ) mit Bestückungsplan. Etwas nachteilig finde ich die Länge des Boards für kleine Gehäuse, vielleicht kann man den ESP-Teil und den Nano-Teil trennbar machen, so daß eine Sandwich-Anordnung möglich wird : oben ESP unten Nano. Aber ansonsten sage ich well done zu den Kainas ! Gruß GDR
Hallo fk, danke für die Anleitungen.
MeinPretzelboard meldet im Monitor das Folgende. Nach Eintippen von AT-Befehlen erscheint aber nichts! Wer kann helfen? Danke! (Windows 10. Arduino 1.6.6 Driver Install success)
Baudrate OK
Config OK
Configuration successfull
Server OK
Hi,
was du siehst sind die Ausgaben vom Initialisierungsprogramm. Wenn du AT-Befehle testen möchtest, dann Uploade zunächst das oben verlinkte Programm.
Tausend Dank! Es geht!
Weiß der Teufel, warum.
beim Upload kommt immer die Fehlermeldung:” avrdude: stk500_getsync() attempt 10 of 10: not in sync: resp=0x20″
was kann ich tun? :D
bei mir auch …
(bin jetzt von OSX auf Win NT gewechselt … und stecke jetzt auch hier)
So trivial ist das aber nicht: Habe auf 2 Rechnern (Win10 Home; Win10 Pro) versucht genau nach obiger Anleitung mit angegebenen Treibern den Nano zu installieren, es gab in beiden Fällen Probleme, der Port ist entweder nicht anwählbar oder die Übertragung funktioniert nicht.
Habe aber auf beiden Rechnern ohne Probleme einen Mega 2560 installiert.
Kann der Nano selbst ein Problem haben?
Problem erledigt: USB-Kabel hatte offensichtlich einen Defekt!
Hello Is the software for all the days already downloadable, or do we really have to wait until december 1st, 2nd and so on ?
I opened the first door and found the module. However, I think I need a cable to connect te module to the computer. Is the cable included in the calender? If so, in which day?
No the cable is not included but it is a standart microUsb cable like the ones for Smartphones and other devices