Day 15: Remote Control Receiver
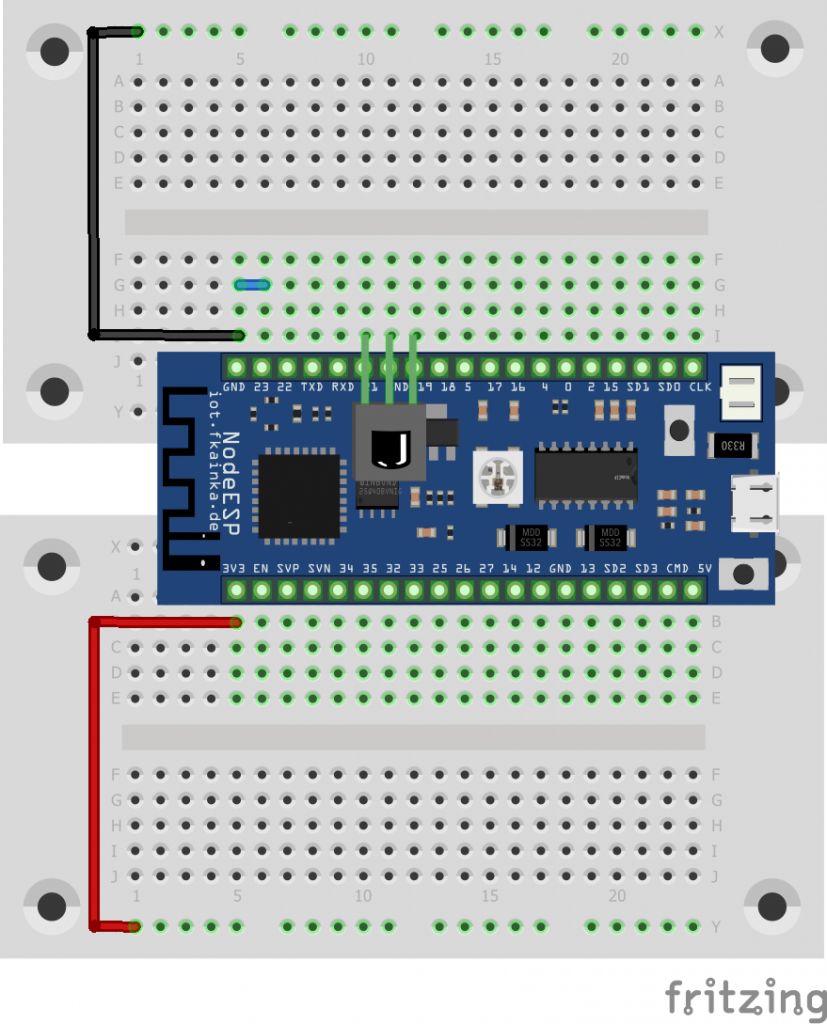
The door reveals a very special component today, namely an infrared receiver module. You can use it to 15. Tag receive customary infrared remote-control signals. We will use the following setup.
After the circuit is set up, select today’s program. Please note that you will not be able to reach the board’s website, because it is deactivated for our experiment today. The board works now in headless mode and has no visible interface. If you want to run the website again to activate other programs, for example, you only have to pull out the jumper from pin 23 and restart the board. Everything will run as usual.
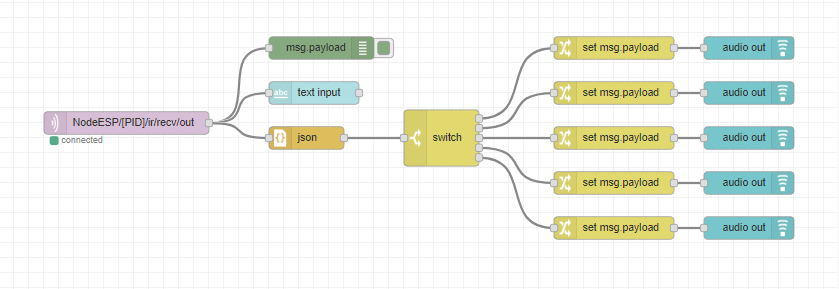
Implement first today’s flow into your Node-RED environment and see, if today’s program is working properly. Do not forget to disable the previous flows and adjust the MQTT topic to your personal topic.
As soon as you have activated the flow, you can point a remote control at the receiver. On the GUI page you will then see text sent by the board such as:
{“cmd”:”ir_recv”,”type”:3,”value”:551489775,”length”:32}
Important here is the value. For example, select the power button on your remote and copy the value received. Enter the value into the switch node. At present you can enter five different values into the switch node, meaning five different remote-control buttons. Each of these keys then leads to a node that sets a text as a payload and forwards it to an audio-out node. The first value in the switch node would be the power button. Therefore, “Power” is read by the browser. We are using this here only for the purpose of demonstration. As for smart homes, you could easily dim the living room lighting when the TV is switched on. Node-RED makes customization very easy.

 Deutsch


Hallo Fabian (fk),
bin neugierig: Was ist der Grund dafür, dass bei diesem Versuch die Web-Oberfläche deaktiviert werden musste?
Viele Grüße, J.J.
Ich erinnere mich dunkel dass der Prozess Webserver und der Prozess Ir-Senden zum Reset geführt haben. Ich glaube es lag daran, dass letzterer Prozess genaues Timing erforderte und andere Prozesse geblockt hat.
Verstehe. Danke für die Info. :-)
Das ganze ist so schlecht erklärt… Was ist unter dem Punkt: “MQTT-Topic an Ihr persönliches Topic anzupassen.” gemeint???
Du musst wie an den vorgehenden Tagen im obigen Pastebin-Code wieder [PID] durch deine NodeESP-ID ersetzen.
Funktioniert gut. Ideal wäre es, wenn bei neuen Eingangswerten der gerade abgespielte Sound sofort unterbrochen und der neue beginnen würde. So hat man den Eindruck einer sehr träge reagierenden Fernbedienung. Aber das kann Node-RED wahrscheinlich nicht. Der NodeESP selber reagiert flink und liefert bei einem Tastendruck fast ohne Zeitverzögerung den entsprechenden Wert.
@paulaner
Das Schwärzen der MAC-Adresse/PID wäre unnötig, wenn die User-Authentifizierung funktionieren würde… :-)
Ich habe mich auch mal damit beschäftigt, ein Thema welches nicht zu unterschätzen ist.
Das Anlegen einer Passwortdatei, das verschlüsseln mit dem mitgelieferten Tool, starten des Brokers mit Passwort/Benutzer etc..
Auch hab ich mich mit Winshark beschäftigt und den Datenverkehr mit geschrieben und versucht zu analysieren.
Müßig.
Was ist mit dem Benutzer/Passwort des Brokers Fabian?
Wenn es nicht geht, ok, aber eine Antwort wäre angebracht.
Hallo, ich musste die Passwort-Funktion kurz vor dem Kalender deaktivieren, da diese plötzlich nicht mehr kompatibel zum online Broker war. Ich habe heute wieder etwas Zeit um das genauer zu Testen. Ich hoffe das die Funktion bald per Update wieder nachgereicht wird.
Danke
Ich verstehe noch nicht ganz den Sinn eines öffentlichen Brokers. Wenn ich einen Broker oder auch Node-RED ungesichert im internen Netz betreibe, ist es doch OK. Wenn ich vom Smartphone außerhalb auf eine Node-RED Dashboard-Seite zugreifen oder mit Hilfe eines MQTT-Clients Befehle absetzen möchte, dann baue ich vorher einfach am Smartphone eine VPN-Verbindung ins heimische Netz auf. Also für welche Fälle benötige ich einen öffentlichen Broker?
Hallo,
heute habe ich mal versucht, einen eigenen mosquitto-Server einzurichten. Ohne Authentifizierung funktioniert das wunderbar, aber sobald ich einen “User” einrichte und anonyme Verbindungen deaktiviere, erhalte ich immer eine Fehlermeldung “Socket error on client [PID]”, obwohl ich Nutzernamen und Passwort seitens Nodeesp sicher richtig eingetippt habe.
Gibt es da einen speziellen Trick, den ich da übersehe?
Hallo,
funktioniert bei mir auch sehr gut.
Vielen Dank
Hallo,
super funktioniert.