Day 22: TalkBack
Today’s project is about another app of the ThingSpeak page, i.e. the TalkBack-App. This function permits creating a command that is read and executed by the controller. What appears nonsensical with a single controller does make sense when using two or an entire network of controllers. Some boards can act as sensors then, e.g. with motion detectors, and send a TalkBack command. Another module reads the command from the ThingSpeak page and then opens the door or reports an alarm.
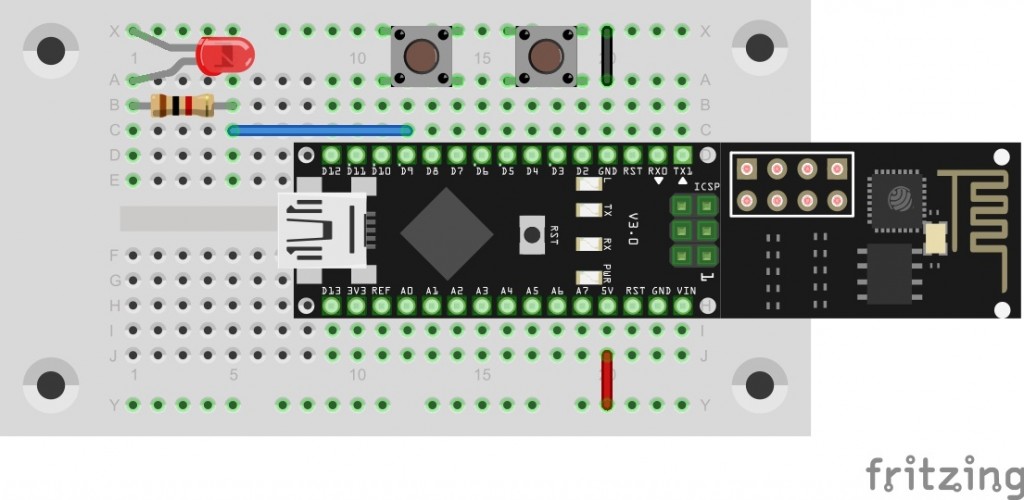
You will find another button behind today’s door. The setup of today’s experiment consists of an LED with a dropping resistor and two buttons as the figure shows.
The program: Day22_ThinkSpeakTalkback
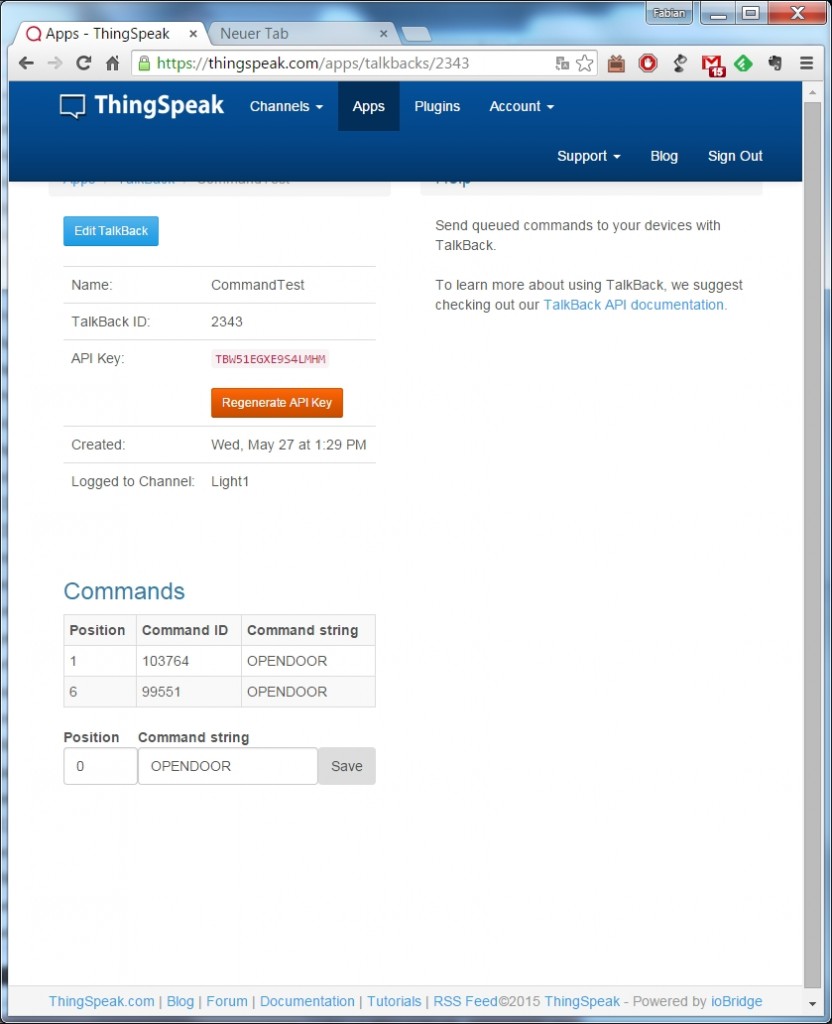
First, you need to create a new TalkBack channel under APPS – TalkBack. If you like, you can also have the commands entered in a channel. This can be the already-created light channel of the 19th day, or a dedicated channel. All commands are then logged. Particularly the API key, which you will enter in #define TalkBackKEY, is important. In addition to the API-KEY, you now also need an ID, which you will find in the overview under TalkBackID, after you have clicked Save-TalkBack. Enter #define TalkBackID into the program here.
If you upload the program now and call the serial monitor, you will first see the message No Command. Push one of the two buttons now. After a brief time, the message OpenDoor or CloseDoor will appear, depending on which button you pushed. For the OpenDoor command, the LED will also light up.

 Deutsch


Hi,
da die Button mit GND geschaltet werden liegt beim schalten auf Pin 2 und 7 auch Strom. Ich habe mal das Programm geändert und habe diese Pin mit angegeben, da läuft es bei mir stabiler und das ständige einwählen in das Wlan geht gegen Null. auch die Wartezeit von 50 auf 100 erhöht.
#define BUTTON1 5
#define BUTTON2 10
#define BUTTON3 2
#define BUTTON4 7
#define LED 9
#define LED_WLAN 13
#define DEBUG true
#include
SoftwareSerial esp8266(11, 12); // RX, TX
const byte thingPost[] PROGMEM = {
80, 79, 83, 84, 32, 42, 85, 82, 76, 42, 32, 72, 84, 84, 80, 47, 49, 46, 49, 10, 72, 111, 115, 116, 58, 32, 97, 112, 105, 46, 116, 104, 105, 110, 103, 115, 112, 101, 97, 107, 46, 99, 111, 109, 10, 67, 111, 110, 110, 101, 99, 116, 105, 111, 110, 58, 32, 99, 108, 111, 115, 101, 10, 67, 111, 110, 116, 101, 110, 116, 45, 84, 121, 112, 101, 58, 32, 97, 112, 112, 108, 105, 99, 97, 116, 105, 111, 110, 47, 120, 45, 119, 119, 119, 45, 102, 111, 114, 109, 45, 117, 114, 108, 101, 110, 99, 111, 100, 101, 100, 10, 67, 111, 110, 116, 101, 110, 116, 45, 76, 101, 110, 103, 116, 104, 58, 32, 42, 76, 69, 78, 42, 10, 10, 42, 65, 80, 80, 69, 78, 68, 42, 10
};
void setup() {
Serial.begin(19200);
esp8266.begin(19200);
if (!espConfig()) serialDebug();
else digitalWrite(LED_WLAN, HIGH);
pinMode(BUTTON1, INPUT_PULLUP);
pinMode(BUTTON2, INPUT_PULLUP);
pinMode(BUTTON3, INPUT_PULLUP);
pinMode(BUTTON4, INPUT_PULLUP);
pinMode(LED, OUTPUT);
}
void loop() {
String com = getTalkBackCom(TalkBackKEY, TalkBackID);
if (com == “”) {
debug (“No Command”);
}
else
{
if (com == “OpenDoor”) digitalWrite(LED, HIGH);
if (com == “CloseDoor”) digitalWrite(LED, LOW);
debug(com);
}
for (int i = 0; i <= 20; i++)
{
if (!digitalRead(BUTTON1)) {
sendTalkbackPost(TalkBackKEY, TalkBackID, "OpenDoor");
debug("Send Open");
while (!digitalRead(BUTTON1));
}
if (!digitalRead(BUTTON2)) {
sendTalkbackPost(TalkBackKEY, TalkBackID, "CloseDoor");
debug("Send Close");
while (!digitalRead(BUTTON2));
}
delay(100);
}
}
Hey
ich habe foldenges Problem beim heutigen Tag:
Es wird angezeigt, dass eine Verbindung mit dem WLAN besteht. Dann kommt folgende Fehlermeldung:
ESP SEND ERROR: AT+CIPSTART=”TCP”,”api.thingspeak.com”,80
ESP SEND ERROR: AT+CIPSEND=102
Danach wird neu verbunden und die Fehlereldung erscheint erneut.
Hat jemand eine Idee, wo der Fehler liegen kann?
Schonmal vielen Dank im voraus.
Liebe Grüße
Ralph
Hallo!
Das Board wählt sich ins W-LAN ein, TalkBack ist erstellt,
aber wenn ich auf einen der Taster drücke . . .k passiert nichts. Muss man auf dem TalkBack noch die Commands eintragen? Wenn ich das mache, und auf “SAVE” drücke, erscheint bei mir im seriellen Monitor “OPENDOOR”. Ansonsten erscheint da sekündlich “No Command”. Mehr passiert nicht. Nix LED nix Tastersignal. Wisst ihr da eine Lösung?
Hi, vielleicht hast du die LED verkehrt angeschlossen.
Der Button am Pin 5 ist für OpenDoor.
Der Button am Pin 10 ist CloseDoor.
Bei meinen Button muss ich beim drücken etwas hin und her bewegen damit sie schalten.
Danke dir für die Hilfe. Ich hatte die Buttons falsch angeschlossen. Deswegen kam kein Signal durch.
Bei Thingspeak/APPS/TalkBack/CommandTest/Edit
Was genau trage ich da bei Commands ein?
Das heutige Programm versteht “OpenDoor” und “CloseDoor”. Du kannst natürlich auch eigene Texte einbauen.
In diesem Beispiel wird ca jede Sekunde (20*50ms) eine Verbindung auf- und wieder abgebaut. Das scheint mir etwas viel. Vielleicht kommen daher Probleme.
Danach wählt der NanoESP sich wieder neu ins WLAN, das finde ich nicht schön.
Das heutige Projekt funktioniert nicht richtig. Oft kommen “ESP SEND ERROR”. Dann startet der Mikrocontroller teilweise neu.
Den Grund konnte ich bisher leider nicht finden. Die Close wurden jedenfalls immer korrekt gesendet.
Habe selbes Problem, nach mehrmaligen Taster drücken open/close friert das Programm ein.
Teilweise auch Fehlermeldungen wie:
ESP SEND ERROR: AT+CIPSTART=”TCP”,”api.thingspeak.com”,80
ESP SEND ERROR: AT+CIPSEND=102
Hallo zusammen
Seit Tag 11 funktioniert bei mir kein Projekt mehr…
Ich konnte nicht mit der IP des Moduls auf eine Webseite zugreifen(fehlermeldung).
Error im seriellen Monitor…. etc
auf *keine
… LED mit Vorwiederstand …
Hab den heutigen Fehler gefunden!
Welchen Fehler meinst du?
So Schön! Ha Ha. Den ersten und hoffentlich einzigen.
“Vorwiderstand” wäre richtig